


Ever wondered how to insert dates in Excel, specifically to track the last modification date in your cells? Keeping track of the last modified date in Excel can simplify your work and help you stay organized. Imagine you maintain an employee directory—people get hired, transfer to different branches, and so on. You use Excel to centralize all this information, including hiring dates, positions, office locations, and more.
Now, if someone modifies the file online, but your Employee Directory doesn't show the last modification time, it becomes challenging to identify which version of your printed files is the most up-to-date. Displaying the last time your file was modified will make your work much easier.
In this article, we'll explore two options:
- Delve into how to display the creation time and last modification time in Excel (it’s a bit advanced and somewhat disappointing at the same time).
- Discover how RowShare, an Excel-integrated alternative, can accomplish this with just a few clicks, offering a more efficient solution.
Getting the last modification date in Excel
If you simply want to see the creation time and last modification time of your Excel file, it's quite simple:
- Click on “File”
- Select “Info”
- Find the information you need under the “Related Dates” section
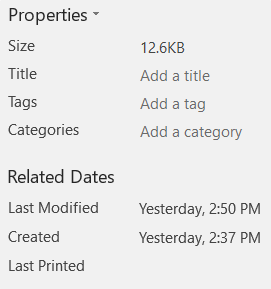
Unfortunately, this date is not available in the spreadsheet itself, but only in this settings page. If you want to have it displayed in the spreadsheet itself, you need to revert to an Excel VBA function. It's easy if you're already into programming:

- In your Excel worksheet, cllick on ALT + F11 to open the Visual Basic editor
- In Visual Basic Editor, click on the “Insert” menu
- Select “Module”
- Paste the following code into the new module:
Public Function ModDate()
ModDate = Format(FileDateTime(ThisWorkbook.FullName), “m/d/yy h:n ampm”)
End Function - Before saving your module, make sure to save your Excel file as Excel Macro-Enabled Workbook
- Save your module
- Return to your Excel worksheet
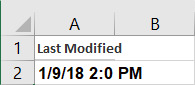
- Paste the following code into the cell where you want to display the last modification time: =ModDate()
In this example, the code is pasted in cell A2.
It doesn’t update automatically. You must close your file and reopen it to have the last update time.
And unfortunately, it is still the file-level modification time, and not the row-level modification time.
If you truly need to track when rows are added or modified in your tables, it might be worth considering alternatives to Excel. This doesn’t mean you should stop using Excel altogether, but for specific tasks like tracking modification dates, other applications may be much better suited to the job. Let's have a quick look at RowShare.
Display Created Time and Last Modified Time in RowShare
Now, let’s explore another solution: an online collaboration tool that integrates seamlessly with Excel to boost your efficiency. With RowShare’s “Creation Date” and “Last Write Date” column types, you can easily keep track of when an entry was created and when it was last updated. Simply follow these steps:
- Create a table from a template or start from a blank page.
- Add a “Creation Date” column and/or a “Last Write Date” column.
That’s really all, it’s as simple as that! Each row now has this information always up to date, in these new columns.
Here is a quick video tutorial:
As you can see, whenever a row is modified, the last write date of that row is updated.
RowShare can also send notification upon updates, send reminder to anyone who is late updating his data...
Don’t just take my word for it, go ahead and give it a try yourself!


