


.avif)
You likely found this article after discovering that inserting pictures in Excel isn't as straightforward as you'd hoped. In this article, we'll share two solutions:
- How to actually insert pictures in Excel. You’ll see that while it’s doable, it can be quite a hassle if you want the pictures to fit within cells, follow sorts and filters, and avoid making your file so large that no one can open it.
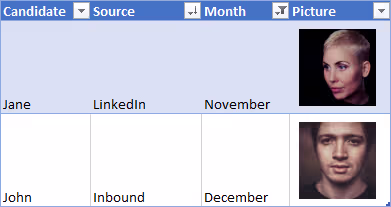
- How RowShare, our web-based tables, offers a great alternative. With RowShare, you can easily create tables that you can share with anyone, complete with pictures neatly fitted in their cells.
How to insert pictures in Excel cells
In a way, it is as simple as clicking Insert, Pictures, and choosing the image
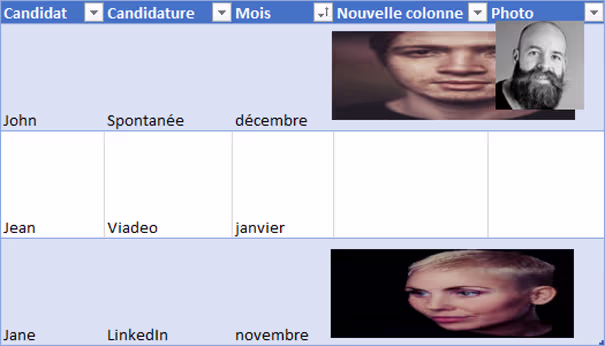
Indeed, you may have successfully placed a picture over your Excel sheet. However, if you're not careful, your pictures might become distorted or move around over time, ending up like this:
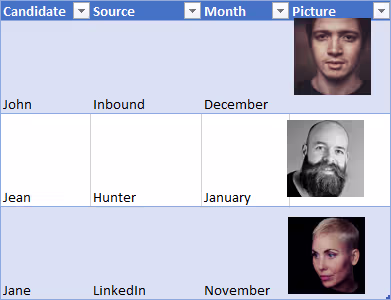
You’ve just realized that what you actually wanted was to insert pictures into specific Excel cells, not just place them on the worksheet.
The detailed procedure
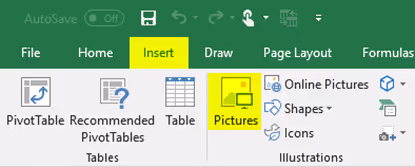
You actually need to start from the Insert Pictures feature, in the Insert Tab. Depending on the size of your Excel cells and the size of your picture, Excel might not insert the picture in an Excel cell, but lay it over the worksheet.
To ensure that your picture isn't distorted and behaves as expected when your table is filtered or sorted, it's important to fit the picture inside an Excel cell. You can either widen the Excel row or column or shrink the picture. If the picture needs to be larger than the cell, make sure its top left corner is within the targeted cell. Then, you have two options, each with its own benefits and limitations:
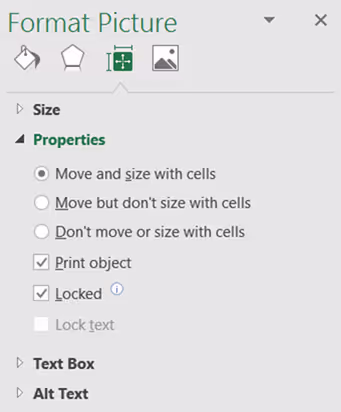
- To prevent pictures from being distorted when resizing columns or rows, right-click on the picture, select Format Picture, then in the Excel tab that opens on the right, click on the third icon (Size & Properties) and select "Move but don’t size with cells."
- However, if you want to filter a table that includes pictures, you'll need to revert this setting and select "Move and size with cells."
Depending on what you're trying to achieve with your table, you'll need to adjust the settings for each picture accordingly. Keep going—you've got this!
That way, your pictures follow their cells. If your sort or filter your table, pictures behave as expected.
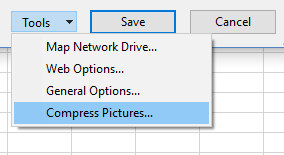
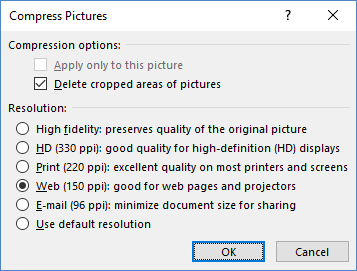
Last, you have to pay attention to the size of your pictures. As always with pictures, a balance must be found between picture quality and file size. When you save your file, click on Tools then Compress Pictures.
To save time, skip all these settings and get a truly collaborative and secure table, I would like to suggest RowShare, our online tables.
Alternative: Insert Pictures in A Table with RowShare
If you want to easily add pictures to table cells, RowShare, our collaborative table, offers an intuitive alternative. There's no need to send files anymore; simply share a link to give access to the table from anywhere. You don’t have to worry about file size, and you can control whether your coworkers can modify the entire table or only specific rows. Plus, you’ll receive notifications when someone makes changes to your table.
You can start by creating a table from our catalog or begin from scratch if you know exactly what you need. Add one or more Image columns to your table and upload pictures effortlessly. No need to send large files via email—just share the URL of your RowShare table. You also have full control over your table and pictures, with options to sort, filter, set columns as read-only, and more. It’s all up to you!
Tip: If you already have your table in Microsoft Excel, import it to RowShare and change the appropriate column type to Image.
You now have your web table ready to be shared. You can export or even synchronize it with Excel to access the best features of both tools. In this case, your Excel file will not display the actual pictures, but a link to your pictures.


